| Recycling Polystyrene |
|
|
|
|
Paul Volker |
 |

POLYSTYRENE PRODUCTS HAVE A NUMBER 6 TRIANGLE MARK
|
OVER 8 MILLION TONS
of plastic are dumped in our oceans every year.
|
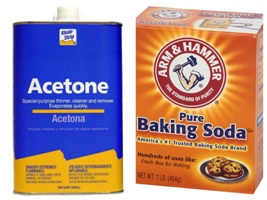
My simple and safe polystyrene recycling method turns polystyrene into hard plastic using acetone and baking soda, glass jars and tin cans. No plastic is burned or melted, no electricity is used,
and no waste is produced.
|
|
EASY PRINT-OUT INSTRUCTIONS:
HTML VERSION
•
PDF VERSION
|
Introduction
I have been developing a safe and inexpensive way to turn polystyrene ("Styrofoam" cups, packing peanuts, etc). into a putty that can be kneaded, shaped or cast in a mold, then hardens as a rigid plastic, which can then be sanded and painted.
My primary interest in doing this is to reduce the amount of polystyrene going into landfills, oceans, etc. and my secondary interest is in creating a medium for artists, or an easy to produce industrial material.
The process requires three component elements:
1. polystyrene cups, packing material, etc. which can be identified on products with the number 6 inside a recycle triangle symbol.
2. Acetone
3. Baking soda
Equipment:
Glass jar (a gallon size glass pickle jar is ideal) with tight fitting lid
Glass or metal bowl, or even an empty paint can
A flat metal or glass surface where you can leave your putty to harden. A metal cookie sheet or cardboard covered with aluminum foil is perfect.
Optional: metal spoon, rubber kitchen gloves
Note: STYROFOAM® is another name for polystyrene.
It is a registered trade name. While "Styrofoam" is somewhat pliant, many hard plastic products, such as crystal clear picnic utensils, are also often made from #6 polystyrene and can be recycled using this process.
|
Safety:
Read and follow warning instructions on acetone container.
It is important to do this in a well ventilated area, or outside.
Do not get acetone in your eyes or mouth.
Wear eye protection.
Wash your hands thoroughly after handling.
Preparing the polystyrene:
Pour about one cup acetone Into a glass jar, and add pieces of polystyrene (styrofoam cups, chunks of packing material, packing peanuts, etc.) and they will immediately begin to dissolve.
Keep adding as much polystyrene as possible.
As the amount of polystyrene increases, the disolving process will begin to slow down. Don't add more acetone. There is still plenty of acetone in your jar, and even as your solution becomes more blob-like, it will continue to dissolve what you feed it!
Your goal is to create a very thick gel. You may be surprized by how much polystyrene is needed. That's because styrofoam is mostly trapped air. There are many other #6 plastic things that will dissolve, such as some cups or picnic eating utensils, and even some CD cases, but they will take longer to dissolve because they do not contain as much air.
Important:
Keep the jar lid tightly closed when not adding foam or removing gel.
Close the lid to the jar tightly, and wait. The foam will continue to be "eaten" by the gel.
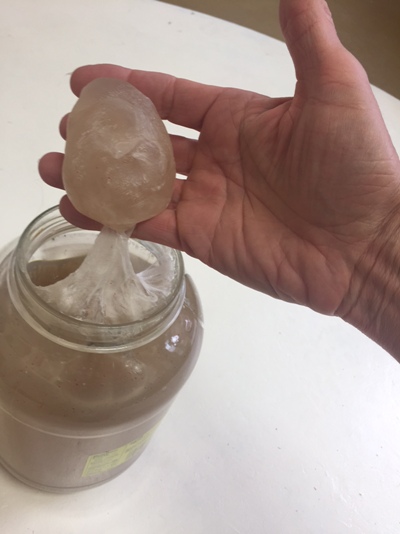
Allow the mixture to sit for a few minutes and something very interesting happens: the volume of gel goes down!
This is because trapped air is being released. Then, you can continue adding more foam, even when nothing seems
to happen at first, and it will eventually be consumed. The thicker your plastic gel is, the better.
If you tilt the jar and a layer of liquid (acetone) is visible, you can certainly add a lot more scraps of foam. You can also drain off the acetone. It easily dilutes in water.
Notes:
The acetone breaks down the foam and makes it more liquid by separating the styrene molecules so they disconnect rather than connecting as a solid. When the acetone evaporates, the styrene connects again. In this process, we will connect the styrene to the baking soda.
One interesting thing you will see if you dissolve foam cups with printing on them (fast food cups) is that the ink does not dissolve, but retains its color, and will appear as tiny flecks in the polystyrene gel.
20 cubic feet of dissolved styrofoam reduces to less than 1cubic foot of gel!
Many packing peanuts in use today are made from starch, rather than polystyrene. They will not work in this process. You can identify them easily,
as they dissolve in water and will stick to a moistened finger.
|
Creating the putty:
What we are going to do next is to take some of the gel that we made of dissolved polystyrene,
and simply mix in dry baking soda.
Put about a half cup of of baking soda into your mixing container. A glass or metal bowl will work. Some plastic containers will work too, but avoid using them unless you are certain that they will not be affected by acetone.
Also, dust your hands with the baking soda. This will help keep the acetone gel from sticking to your hands when you start to knead it. If it does stick, don't worry. Even though it is very sticky, it will begin to dry quickly and can easily be rubbed or peeled off your fingers.
Scoop out about a half cup of the polystyrene gel, and drop it into the baking soda, and gently flip it over so that it gets coated on all sides. The baking soda will stick to it.
Then begin kneading the acetone gel and baking soda together. The goal is to have the gel and the baking soda completely combined, with no gel stickiness and no baking soda lumps.
|
Notes:
As mentioned above, this gel is really sticky! But it also dries very quickly. Rub it off your hands, and just mix it back in. Even if it starts to feel like it is drying, keep kneading it all together for about five minutes. Add more baking soda as needed, and keep kneading it, stretching it, squishing it, and pinching it in your hands until it is no longer sticky but becomes smooth like dough. Pinch it as you knead it, to make sure as much of the stickiness is gone as possible. When you can squish it and fold it without any of it being sticky, then it is ready to use.
|
Creating a hard plastic object
This material behaves a little differently than dough, or clay, or polymer clay.
In order for you to familiarize yourself with its properties, just make a simple "pancake".
Later, you experiment with more complicated shapes.
Roll your putty into a ball. If it still feels sticky, knead more baking soda into it.
Make sure it is completely combined, or else you will get dry, chalky deposits
of baking soda in your finished object.
Pinching with your thumbs and fingers, begin to flatten the ball out.
You can also roll it directly onto your metal or glass surface to flatten it like a pancake.
Use an unopened can of soda as the rolling pin.
Roll it out very, very thin, about the thickness of a nickle.
THAT'S IT! (for now). Allow it to harden. It will begin to harden immediately,
but may not be completely hard for two or three days.
|
Notes:
It Puffs Up!!!
This is because acetone is colder than room temperature. As it evaporates, your plastic object is warming up to room temperature. It still has air trapped in it, and warm air expands. If you hold your finished object up to the light, you will see it is full of air bubbles, like when bread bakes.
There may be ways to eliminte the air bubbles, such as conducting the process in a cold environment. The amount of expansion depends on many factors such as room temperature, the ratio of gel to baking soda, and thickness of the shaped object. Using this process, a piece rolled out about as thin as a corn tortilla puffs up to the thickness of pita bread.
This putty has no real "structural integrity" as clay or play-dough does, Even though it is expanding a little, depending on how nyou use it, the putty may sag or flatten out a little bit until it is hard So, keep this in mind when using it in projects.
It will stick to wood and fabric. It sticks to cement and asphalt.
It will probably stick to almost any porous surface.
If you allow a pancake shape to dry on a sheet of glass, it will be "shiny smooth" on the side facing the glass, and may seem difficult to remove at first. This is merely suction. Once completely hardened, it can be pried off with a credit card.
Two hardened plastic shapes can be made to stick together by using some of the original gel as glue. The acetone will weld the shapes together.
|

ACETONE & BAKING SODA

WOODEN BOARD COVERED
WITH ALUMINUM FOIL |

THESE ARE JARS WITH STYROFOAM
IN DIFFERENT STAGES OF DISSOLUTION,
SEPARATING AIR FROM THE STYRENE.
SOON, ALL THE AIR WILL RISE TO THE TOP
AND MORE FOAM CAN BE ADDED. |

STUFFING STYROFOAM
INTO JAR OF ACETONE |

DISSOLVED, THICK POLYSTYRENE
READY TO MIX WITH BAKING SODA |

PARTIALLY MIXED BALL
IN CAN WITH BAKING SODA |

KNEAD AND SQUEEZE IT UNTIL
NONE OF IT IS STICKY |

KEEP FOLDING IN
MORE BAKING SODA |

YOU SHOULD END UP WITH A SOFT, STRETCHY, NON-STICKY "DOUGH"
THAT CAN BE ROLLED FLAT OR INTO LONG "SNAKES" |

TWO "PANCAKES" FORMED ON CAN LIDS.
|

DISCS FORMED ON CAN LIDS. THE FLAT SIDES ARE STUCK TOGETHER WITH POLYSYRENE GOO FROM THE JAR, WITH A WIRE INSERTED.
NOW IT CAN BE SANDED AND PAINTED TO MAKE A DECORATION.
|
| |
|
|
|
|
|
|
|
|
|
|

|
PAUL VOLKER • CONTACT
|
|


